Zoom
Zoom provides remote conferencing services that combines video conferencing, online meetings, chat, and mobile collaboration.
The Zoom client can be downloaded from the link above or from the PNW Software Center.
Zoom Guides
Zoom @ Purdue
Thanks to a Volume License for Purdue-associated accounts, please contact the CSC first to determine if you need to request a Zoom license.
Request Forms
Request for assistance with an online/virtual event needing a Zoom license
Users no longer need to request Zoom licenses due to Purdue entering into a Volume License agreement.
Brightspace
Zoom has been added to Brightspace so that instructors can natively use the service to host virtual Zoom sessions within Brightspace. In order to use this resource, the instructor must have a Zoom account (Basic or Licensed) within the Purdue University Zoom environment. Accounts can either be created here (for Basic accounts), or a license can be requested using the Request Form link below.
Note: In order to use the Brightspace/Zoom integration, users must have either an @purdue.edu or @pfw.edu Zoom sign-in address. For PNW instructors without a current Zoom account, please create one using @purdue.edu. All e-mails sent to that address will forward to your @pnw.edu address. For PNW instructors WITH a current Zoom account, the CSC will contact you to work through your options.
Frequently Asked Questions
General Zoom Usage
To Log Into the Zoom Client (attending meetings, scheduling meetings, chat)
- Download and install the latest Zoom Desktop Client appropriate for your device:
- Open the Client
- Click on “Sign In with SSO”
- The company domain is “purdue-edu” (without quotes).
- If you’ve forgotten the domain, you can click “I do not know the company domain” and enter your Purdue email address (username@purdue.edu instead of @pnw.edu)
- Sign in with your Career Account
- Accept the Duo prompt (unless using a token)
To Log Into the Web Portal (edit your account, schedule meetings, view recordings, change settings)
- Navigate to the Zoom Sign-in page (https://zoom.us/signin)
- Click on “Sign In with SSO”
- The company domain is “purdue-edu” (without quotes).
- If you’ve forgotten the domain, you can click “I do not know the company domain” and enter your Purdue email address (username@purdue.edu instead of @pnw.edu)
- Sign in with your Career Account
- Accept the Duo prompt (unless using a token)
Purdue Fort Wayne:
To log into Zoom, navigate to https://purdue-edu.zoom.us and sign in using your e-mail address and password you set-up during initial account creation. If you have forgotten your password, click on the “Forgot” link in the password field. If you have not yet created a Zoom account, click on the link that says “Sign-up Free”.
Using an alias email address is not supported. When logging into Zoom using Single Sign-On (SSO), Zoom uses your career account email address to identify you. If you have an account setup with your alias email address, and log in with your Career Account, a duplicate account will be created for you using your Purdue email address.
If you would like to change from your alias email to your career account, please see the question below: Can I change my Zoom email address?
If you currently use an alias email address for Zoom, and would like to discuss your options, please email CSC@PNW.EDU.
If you have not yet signed into Zoom with SSO, you can change your email address. Please see the instructions for that process here. If you have already logged in with SSO, or need further assistance, please contact CSC@PNW.EDU.
Departmental/shared accounts are not recommended, but are allowed. If you are sharing an account in order to prevent purchasing additional licenses, that is prohibited (and not necessary with a volume agreement.) However, for presentation purposes and ease of use, there may be situations where a departmental account makes sense. If you have a department/shared account and would like to discuss other options, please contact your local Support Center/CSC.
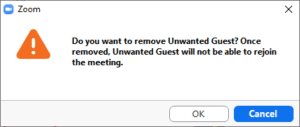
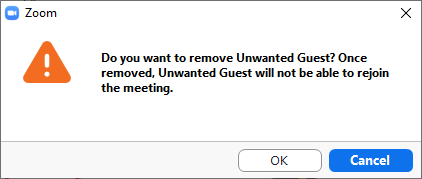
If you are the host or co-host, and you would like to remove someone from your meeting, follow these steps:
-
-
- Hover your mouse over the attendee’s name that you would like to remove.
- Click on “More >”
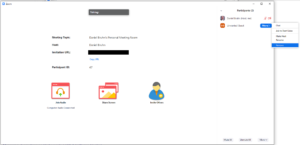
- Click Remove.
- This user will be removed from your meeting and will not be able to return.
-

All Zoom meetings must have a host. This person must be present to start the meeting, or allow users in from the Waiting Room. If a host selects “Join Before Host” in their meeting settings, users will be able to join the meeting without them, but the meeting will automatically end after a certain amount of time if the host does not join. A Licensed Zoom user can delegate scheduling permission to another Licensed Zoom user within the same environment. Please visit this link for instructions: https://support.zoom.us/hc/en-us/articles/201362803-Scheduling-privilege
If you would like to arrange a Zoom meeting with your account, but would like another user to be the host, there are two ways you can do that:
- Create the meeting as you normally would, with your account listed as host. Join the meeting, and then transfer the host role to another user. You may then stay in that meeting, or leave, and the meeting will continue as planned. Instructions: https://support.zoom.us/hc/en-us/articles/201362573-Pass-Host-Controls-and-Leave-the-Meeting
- If both accounts are paid accounts, you may appoint another user as an alternate host. NOTE – the user MUST be a paid user under your account. This involves adding them in User Management, and then adding them as an alternate host. How to add another user to your account: https://support.zoom.us/hc/en-us/articles/201363183-Managing-users How to schedule for someone else: https://support.zoom.us/hc/en-us/articles/201362803-Scheduling-privilege
Depending on how you wish to connect to the meeting, you will need some combination of the following:
- Computer with internet connection
- Microphone
- Webcam – See this guide on Webcam recommendations
- Telephone
- Mobile Device (The Zoom app is available through Apple iTunes and the Google Play Store)
Focus mode is designed with the digital learning environment in mind, allowing students to stay attentive or work on their tasks while under supervision, without being distracted by others and their tasks. This feature gives the host and co-hosts view of all participants’ videos without other participants seeing each other. This extends into screen sharing, as the host and co-host can view and switch between each participant’s shared screen, while the participants can only view their own content. If the host finds a participant’s content should be shared with others, they can easily begin sharing the participant’s screen with others.
To enable or disable Focus mode:
- Sign in to the Zoom web portal.
- In the navigation panel, click Settings.
- Click the Meeting tab.
- Under In Meeting (Advanced), click the Focus Mode toggle to enable or disable it.
- If a verification dialog displays, click Enable or Disable to verify the change.
To engage Focus mode as the host or co-host of a meeting:
- Start a meeting as the host or co-host.
- Click More (…) on the toolbar.
- Click Start Focus Mode.
- Click Start to confirm, or select the Don’t ask me again check box to skip this confirmation going forward.
- When Focus mode begins, you and the participants are notified with a banner along the top of the video window. Additionally, the focus mode icon is always visible in the top-left corner of the video window, next to the encryption icon, while focus mode is active.
Virtual backgrounds are available to all users, free and licensed. Virtual backgrounds allow you to hide your surroundings with an image that is automatically “stitched” behind you. It is very similar to the green screen effects used in television and movies – and by your local weatherman!
To use the virtual background:
- When in a meeting, click on the small ^ arrow to the right of the Start/Stop Video icon on the toolbar. (If the toolbar is hidden, move your mouse to the bottom of the meeting screen, or press the ALT key.)
- Select Choose Virtual Background
- From this window, you can select an image to appear behind you. This image can be a still image or short movie. You can select from the pre-loaded options, or upload your own file.
For best results, make sure you have good lighting. Your physical background should be a solid color, and try to avoid wearing clothes that are similar in color to the virtual background. Custom backgrounds should have an aspect ratio of 16:9 and minimum resolution of 1280 by 720 pixels.
Further Reading: Zoom guide to virtual backgrounds
- If you’d like to give participants screen sharing permission when hosting your next meeting, simply click the arrow to the right of the Screen Sharing icon, select Advanced Sharing Options and select All Participants.
- If you’d like to re-enable participant content sharing at the account level, please visit zoom.us/account/setting > In Meetings (Advanced) > and select All Participants.
The Waiting Room feature allows the host to control when a participant joins the meeting. As the meeting host, you can admit attendees one by one or hold all attendees in the waiting room and admit them all at once. You can send all participants to the waiting room when joining your meeting or only guests, participants who are not on your Zoom account or are not signed in.
Waiting rooms are enabled by default, but can be turned on or off for your account, or for each meeting.
To toggle the waiting room feature for your account:
- Sign in to the Zoom web portal.
- In the navigation menu, click Account Management then Settings.
- On the Meeting tab, navigate to the Waiting Room option under In-Meeting (Advanced) and change the setting to enabled or disabled.
- Select who you want to admit to the waiting room.
- All participants: All participants joining your meeting will be admitted to the waiting room.
- Guest participants only: Only participants who are not on your Zoom account or are not logged in will be admitted to the waiting room. If not logged in, they will have an option to log in.
- Note: If Guest participants only is enabled, you can also enable the option to allow internal participants (users on the account), to admit guests from the waiting room if the host is not in the meeting.
To toggle the option per meeting:
- Sign in to the Zoom web portal.
- Click Meetings.
- Click the Personal Meeting Room tab.
- Click Edit this Meeting.
- Under Meeting Options, check Enable Waiting Room.
- Click Save.
How to use the Waiting Room when in a meeting:
- As the meeting host, click Manage Participants.
- Click Admit next to each user’s name to have the participant join the meeting.
- Click Admit All to allow all users in the waiting room to join the meeting.
- To send a user back to the waiting room, hover over the user’s name, and click on the More menu. Then select Put in Waiting Room.
Please contact your local IT Support team for information on acquiring the necessary equipment to use Zoom in rooms on campus, or in your home office.
Personal meeting rooms are similar to personal offices. When you link to your personal meeting room, you are giving your attendees the directions and the key to your office. Your “key” is your password that you set on your meeting, and the “directions” are the link given to your attendees. If you are comfortable sharing this information, then using personal meeting rooms are great – especially for team meetings, or quick meetings with colleagues. (Note: You can always change your personal meeting room password, essentially changing your lock for all future meetings.
If you are meeting with outside groups, or those you would rather not have access to your personal space, then scheduling a meeting room is the better choice. Additionally, we always encourage the use of waiting rooms with all meetings, whether they be held in your personal meeting room or a scheduled meeting room. This will prevent unwanted users from immediately joining an in-progress meeting – even if they have the “directions” and “key.”
Zoom does not allow a user to host multiple meetings at the same time. If the host attempts to have concurrent meetings by scheduling two different meetings at the same time and enables join before host for both meetings (or has an alternative host start one of the meetings), participants will receive a message: “The host has another meeting in progress.” The host will receive the message: “You have a meeting that is currently in progress…”
The current Zoom license available to Purdue University allows for up to 300 participants. Allowances for additional attendees may be purchased. A “Large Meeting” addon allows for up to 500 or 1000 participants, and costs $600/year or $1080/year respectively.
While there is no specific rule about where your recordings should be saved, OIT and the CSC suggest saving your meetings locally on your computer, rather than cloud storage. This will give you more flexibility with uploading through Kaltura, as well as more storage space.
By accessing Settings, you will be able to set the folder for your local recordings, as well as manage your cloud storage, if you so desire. By clicking “Manage”, you will be taken to the Zoom website, and have the ability to manage both any files saved in cloud storage, and a list of recordings saved to your local storage.
Users can still have admin rights over a group of licenses, but will not have as much authority over those users as they would have if they were admins over an entire account. Group admins can still change settings for their groups, but are unable to add/remove/change licenses. Group admins can also do some minor troubleshooting, but do not have access to the full reporting dashboard.
The account does include cloud storage for recording. At this time, IT Security is reviewing this option, and will be deciding on its availability to our users.
Recordings will remain available to the host for 180 days. At that time, they are automatically deleted. Note: This may change depending on the outcome of the security review mentioned above. Additionally, recordings may be deleted sooner if the storage location runs out of space.
In some situations, it may be appropriate for a local IT representative to have the ability to modify settings for a group or department. In this case, the department head may e-mail CSC@PNW.EDU and request this permissions level for one or more IT technicians. The granting of this permission is not guaranteed, and each request will be reviewed.
All apps must be reviewed and approved by the IT Security team. Please direct any requests for Zoom App installations to itpolicyreq@purdue.edu.
Please include the following questions/answers in your email:
What is the name of the Zoom App?
Provide a link to the Zoom App.
How will the Zoom App be utilized?
Will the Zoom App store or transmit Sensitive or Restricted Data?
By what date will you need access to the Zoom App?
This message can mean different things. First, if you are hosting a meeting in your personal meeting room, that will use your Personal Meeting ID (PMI). Check to see if you have changed that recently. If you have, any old meeting links that use your Personal Meeting room ID will need to be updated with a new invitation. Secondly, if you scheduled meetings when your account was NOT in the Purdue University Zoom environment, those will continue to work for a short time. However, those will eventually begin to fail. If you have recurring Zoom meetings scheduled, we recommend updating those with the new Zoom links. (Your new links should start with purdue-edu.)
NOTE: Participants must be using Zoom version 5.7.0 or newer to see pronouns.
From the Desktop Application
- Open the Zoom application on your desktop and log in
- Select your profile icon in the top right hand corner and select “settings” from the drop down
- This will open a new window – select “profile” and then “edit my profile”
- Your profile will appear (you may need to sign in) – under the “profile” tab, select “edit” next to your name
- To add your pronouns, add them to the “Pronouns” field. (You can choose to always have them appear next your name, or Zoom can ask each time before displaying them.)
- Click “Save”
From the Web
- Sign-in to Zoom at https://purdue-edu.zoom.us
- Click on the “Profile” link on the top left of the screen.
- Select “edit” next to your name
- To add your pronouns, add them to the “Pronouns” field. (You can choose to always have them appear next your name, or Zoom can ask each time before displaying them.)
- Click “Save”
Licensed users can delegate to other users the ability to schedule Zoom meetings on their behalf. Both users must be Licensed, and setup within the Purdue University Zoom environment. For information on how to delegate access, and schedule meetings for other users, see the following Zoom support page:
https://support.zoom.us/hc/en-us/articles/201362803-Scheduling-privilege
If you use polling in your meeting, you can run a report after the meeting is over to see the results of those polls. Poll reports are available for meetings that ended at least 5 minutes ago. All poll data is deleted from Zoom after 30 days.
- Note: Follow these directions exactly. Changing the radio/selection button from Registration Report to Poll Report too early will not allow you to download the polling report, and will generate an error.
- Log into your account at purdue-edu.zoom.us.
- On the left side of the main Zoom portal screen, click on Reports.
- Choose the “Meeting” report.
- Choose the Date Range that contains the date of your meeting.
- Click Search.
- Change the Radio (selection) button to “Poll Report”.
- Click Search.
- Find the meeting that contains the poll report you are looking for, and click on the “Generate” link on the right side of the page.
- The screen will automatically redirect to the Report Queue where the report will process.
- Once the report is done processing, and ready to download, a “Download” link will appear on the right side of the page next to the report.
- The download will be in .CSV format.
If you have the Desktop Zoom client installed on your Windows or MacOS computer, you can be notified of your upcoming Zoom meetings. This setting must be enabled on your account prior to use.
How to enable this setting:
- Log into https://zoom.us.
- Click on the Settings link on the left side of the page.
- Find and enable the setting: “Upcoming meeting reminder”.
- Open your desktop client and click on the small gear on the top right corner.
- In the Settings window, navigate to the General category and enable the setting “Remind me x minutes before my upcoming meetings”
- Set the time to your preference.
Accessibility
Use closed captions during a Zoom meeting
Live Captioning:
- The meeting host (probably you) will need to enable closed captioning in their Zoom account
- The captionist will need to be able to add captions to the Zoom meeting
- For details, see the Zoom Support article Using closed captioning
- (For Purdue Faculty) To provide closed captions for a student with a captioning accommodation through the DRC
- Contact the Disability Resource Center (drc@purdue.edu) to request closed captions for all Zoom meeting(s) with this student
- To provide closed captions as a universal design benefit to all students
- Many vendors are available. One option is Alternative Communication Services (ACS). They do not require a contract. Simply contact them to set up an account.
Automatic (Robot) Captions
- See instructions below (How do I enable automatic transcriptions in my Zoom meetings?)
Add captions to recorded Zoom meetings
- Captions are a benefit to a wide variety of people, not just people with hearing loss. So, provide captions as often as possible.
- (For Purdue Faculty)To add closed captions to a meeting recording for a student with a captioning accommodation through the DRC
- Contact the Disability Resource Center (drc@purdue.edu) to request closed captions for all Zoom meeting recordings to be viewed this student.
- To add closed captions to a meeting recording as a universal design benefit to all students
- Use Kaltura (https://mediaspace.itap.purdue.edu) to request one of the following:
- Mechanical captions that are free and must be edited for accuracy
- Professional captions that you pay for and are 99% accurate
- (For Purdue Faculty) Contact tlt@purdue.edu with questions about requesting captions through Kaltura
- Use Kaltura (https://mediaspace.itap.purdue.edu) to request one of the following:
Keyboard Shortcuts
Keyboard shortcuts allow a person to navigate Zoom meetings and features without using a mouse. This is especially important for students who have difficulty using a mouse.
Hot Keys and Keyboard Shortcuts for Zoom
Other Accessibility Considerations
Enabling a sign language interpreter to join your meeting
The meeting host (probably you) will need to “spotlight” the interpreter’s video so it is always visible. Visit the UC San Diego page Enabling for ASL Interpreters for more details.
Zoom Accessibility
Zoom has a built-in tool to provide live captioning during meetings. The host must enable the feature in their settings prior to the start of the meeting, and then must turn on the transcription service during the meeting.
- Enable Captioning by going to Settings > In Meeting (Advanced) > Closed Captioning
- Turn on “Closed Captioning,” and check the box to “Enable live transcription…”

- When in the meeting, the host must Enable Auto-Transcription by using the Meeting Toolbar on the bottom of the screen:
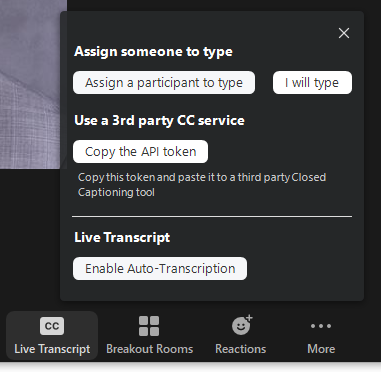
Users will then see Live Captions on the screen during the meeting, and can enable full, live transcript on the right side of the meeting screen.
Note: The Automatic Live Transcription feature does not work with breakout rooms, or in the Zoom for Linux app.
Licensing
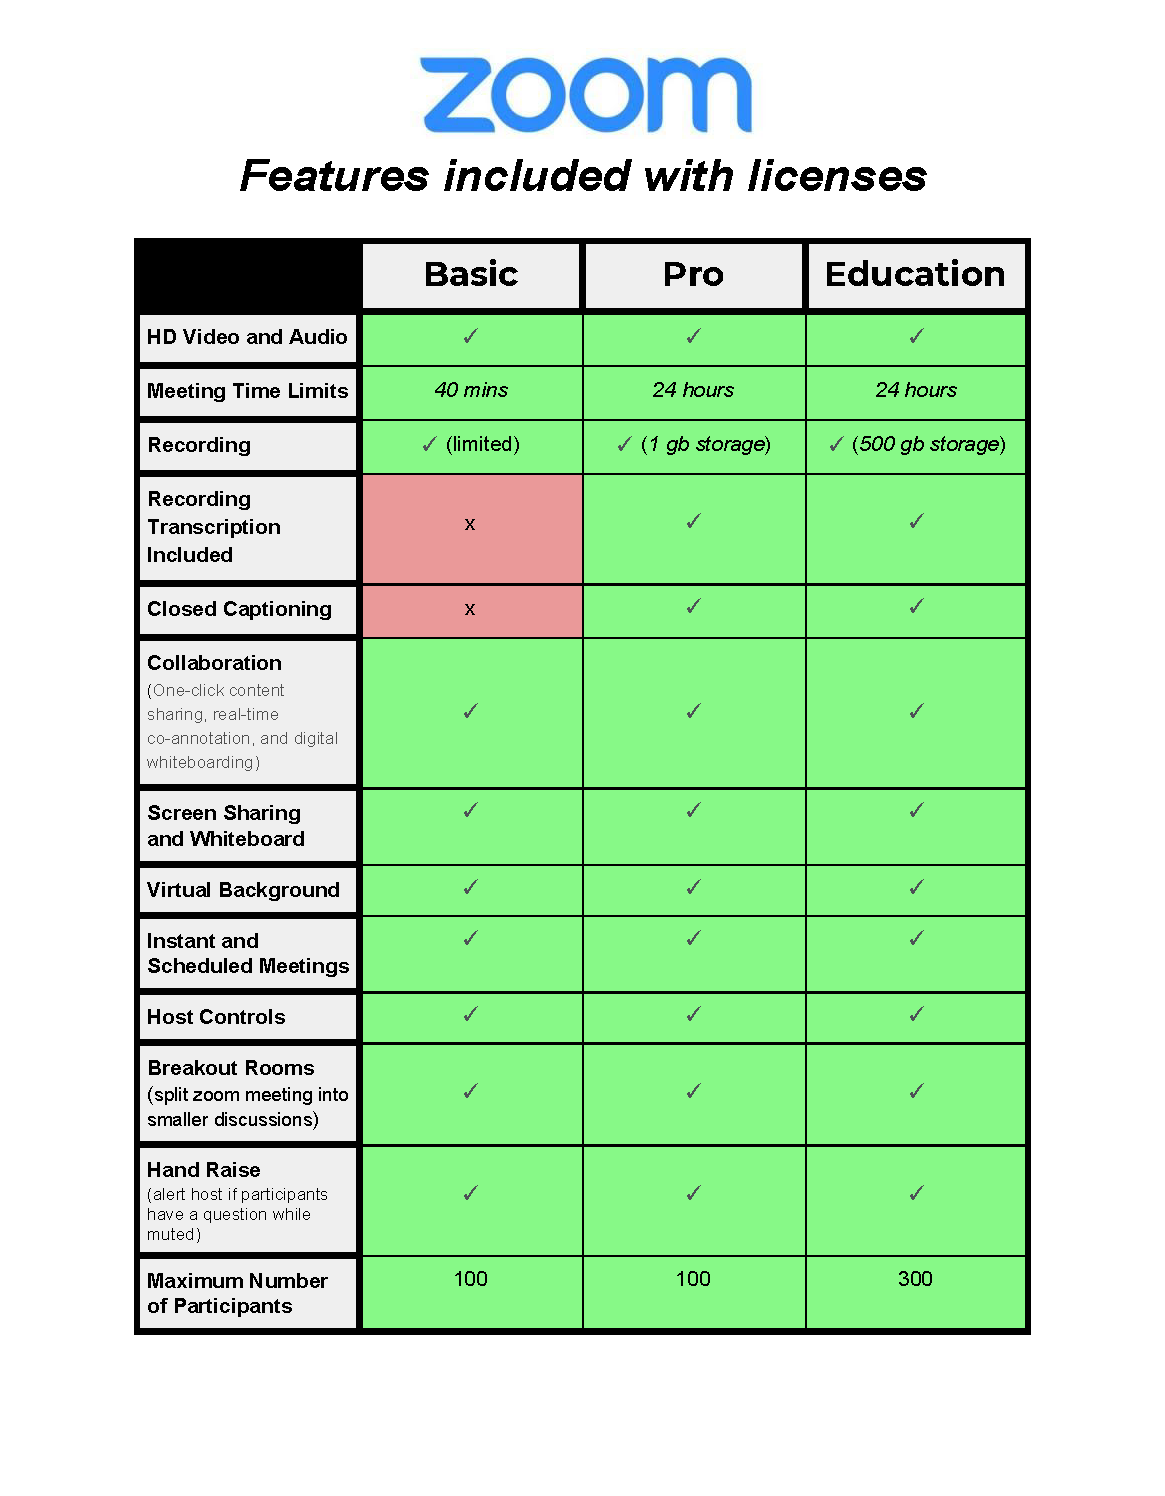
There are two different types of users in Zoom: Licensed and Basic. Licensed users do not have time limits on meetings up to 300 participants, in addition to some other features outlined in other questions on this site. Basic users have a 40 minute time limit on meetings with 3+ participants up to 300 participants.
Here’s how to determine what your Zoom license type is:
- Navigate to zoom.us and login to your Zoom account.
- Click on the “Profile” link on the top left corner of the screen.
- Your license level will be next to the words “License Type” (see example below)
- If it says “Licensed” you have the full licensed version of Zoom
- If it says “Basic” you have access to Zoom with limitations outlined above and on other questions on this site.

All licenses and addons automatically expire on July 30 of each year unless you notify CSC@PNW.EDU 30 days prior to this date. Licenses and add-ons purchased throughout the year will be pro-rated monthly depending on when the license was purchased. The cost to purchase a Zoom license will be reduced by ~$3/month after September.
Purdue has entered into a Volume License agreement with Zoom. All three campuses have agreed to centrally fund licenses for faculty/staff/students for the remainder of FY21. If you need to request Webinar or Large Meeting addons, please request at the Add-On Request Form.
Purdue users (PNW, PWL, PFW) can request licenses using the form above immediately. PWL and PFW users will begin receiving licenses as early as Friday, August 7th. PNW users will begin receiving licenses on Monday, August 3.
*If your department previously purchased a large package of licenses, PNW IS will be working directly with your department to facilitate the transfer of those accounts to the new environment.
Your account, when it is outside of the Purdue environment, is owned and managed solely by you. Therefore, you and only you, have access to your settings. Once you consolidate your account with ours, our IT administrators and security staff have the ability to change settings on your behalf in order to comply with PNW policies, FERPA, HIPAA, etc. This is the change in permission, or loss of settings, referenced by the e-mail. You will still be able to change most of the settings surrounding your account, but others will be locked for the above-mentioned reasons.
If you have previously had administrator rights over a group of licenses, you may be granted admin rights over your “group”.
E-mails from Zoom are sent from the address no-reply@zoom.us. If you are not receiving the email, it may have been caught in your Spam filter, either at the campus level or local software. To start, check the Junk folder in Outlook. If it is not there, check your quarantined list at the campus level.
For @purdue.edu email addresses: https://www.itap.purdue.edu/email/index.html
For other users, contact your local IT Helpdesk.
All currently scheduled meetings should continue to function properly. Future meetings will have a different URL, but the old URL continues to function. We recommend updating the link for future meetings as soon as you are able to ensure continued operation.
No. Unless you fill out the request form specifically asking for your account to be licensed, Basic (free) accounts will remain un-licensed, and no charge will be required. Basic accounts will gain some features from being associated with our master account, such as a 300 person limit, and cloud recording. However, meeting time limits and other limitations placed on Basic accounts from Zoom will still apply.
*Basic is any account that exists for Zoom
**Education includes Basic accounts that have been consolidated into the Purdue Account; if Zoom removes this benefit for Basic accounts, it will be communicated to the University.
No. The current agreement does not allow for discounted purchases of addons. These can, however, be purchased at regular price and added to your account. If you wish to purchase an addon, please fill out the Add-On Request Form.
- All addons are purchased on an annual basis. Addons cannot be purchased per individual event, or month.
- All licenses and addons automatically expire on July 30 of each year unless you notify CSC@PNW.EDU 30 days prior to this date. Licenses and add-ons purchased throughout the year will be pro-rated monthly depending on when the license was purchased. The cost to purchase a Zoom license will be reduced by ~$3/month after September.
When requesting addons, the CSC will need the following information: What addon do you need, (including the participant level), what Zoom account should get the addon (sign-in email), and what Account # to bill the addon to.
Costs for popular addons:
Webinar (500 participant): $690/year
Webinar (1000 participant:) $3400/year
Webinars can also be purchased in 3000, 5000, and 10000 participants.
Large Meeting (500 Participant): $600/year
Large Meeting (1000 Participant): $1080/year
The difference between Webinars and Large Meetings: Webinars give you additional control over your meeting, and should be used when you have meetings with little audience participation. The Large Meeting addon simply gives normal Zoom meetings increased capacity.
Yes. Please e-mail CSC@PNW.EDU and the license can be moved to another user as needed.
Here are the steps that you will need to take to transfer large groups:
- The owner/admin of your site should access the Users page of the Zoom management console.
- Export a list of your current users by clicking on the “Export All” button. This will generate a .CSV file.
- Fill out the form here, but leave the list of users to license blank.
- Submit the form, and then e-mail the CSV file to CSC@PNW.EDU.
Your users will receive an email asking them if it is okay to transfer their account from their current environment, to the new. We recommend notifying your users that this e-mail is coming, so that they know to expect it.
Remote Teaching and Learning
Basic (free) users can still schedule Zoom sessions within Brightspace. However, the same limitations that exist within Basic accounts outside of Brightspace, will exist within Brightspace. If an instructor needs to host sessions longer than 40 minutes, for example, they will require a licensed Zoom account to do this successfully.
Security
Purdue University and PNW Information Services is pleased to be able to provide licensed Zoom accounts to the university community at a highly discounted rate.
The first step in this process will be an e-mail sent from Zoom to all existing Zoom users at Purdue who currently use their @purdue.edu, @pfw.edu, or @pnw.edu e-mail address as their Zoom account name. In order to provide licenses to our users, these existing accounts will first need to be consolidated into our master education account. This e-mail will give users the option to either A. merge their existing Zoom account with the Purdue master education account, or B. change the e-mail used to a non Purdue e-mail address. If you would like to continue using Zoom for Purdue business, licensed or free, you will need to choose option A.
As always, if you are concerned about the safety of any email you receive, please notify your campus’ IT Security team for assistance.
In order to be able to implement Single Sign-On (SSO) to Zoom, all PNW Zoom users need to have their Zoom accounts associated with their @purdue.edu email address. When a PNW user authenticates via Purdue Login, the service sends the user’s @purdue.edu email address to Zoom to connect with their Zoom account. Therefore, all PNW Zoom users will need to have their login username changed from username@pnw.edu to username@purdue.edu so that SSO will connect properly to their accounts.
Q: What if I use Google or Facebook to log into Zoom?
A: If you use an external authentication service to log into your Zoom account, that login method will continue to function properly.
Q: What if I use a shared/departmental account to log into Zoom?
A: Please email CSC@PNW.EDU to discuss how this change will affect your department/shared account.
This change will occur on 1/16/2021.
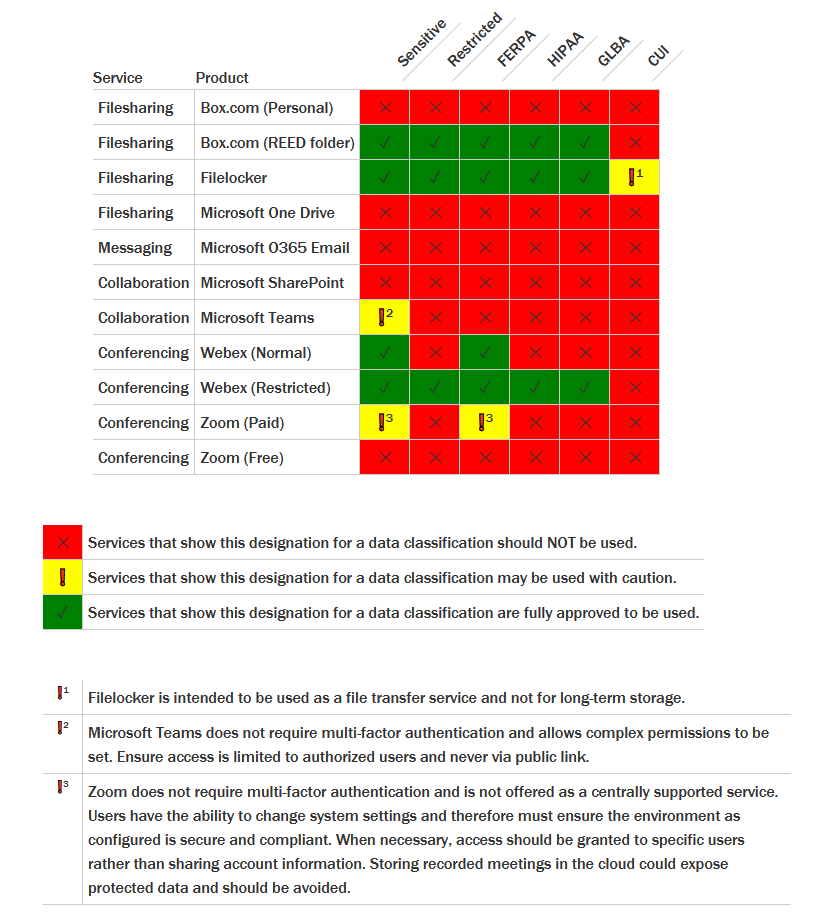
Please consult this chart to determine if Zoom (and other services at Purdue) can be used to meet your needs while conforming with Purdue policies.
Update 10/26/2020: A Secure Zoom environment, with HIPAA compliance, is available. For more information, please contact CSC@PNW.EDU.
The first step is prevention. Setting up your meeting with the correct options will make it much more difficult for an unwanted guest to enter the meeting in the first place, and much more difficult for them to actually do anything if they do.
- Do not publicly advertise your meeting’s link. Put the link to your meeting in materials only accessible to your intended attendees. E-mail, Brightspace/Blackboard, etc.
- Enable the Waiting Room feature. The Waiting room allows you, as the host or co-host, to allow people into your meeting. When attendees first join your meeting, they are placed in a virtual waiting room. The host and co-host see those users waiting and can then let each person in individually, or can allow everyone in who is waiting.
- Note: This setting will be enabled by default for all Zoom meetings starting on March 31, 2020. It can be disabled, but you should only do so if you are confident that your meeting has been secured via other methods.
- How to: https://support.zoom.us/hc/en-us/articles/115000332726-Waiting-Room
- Set a password on your meeting. Setting a password, and then distributing that password to your attendees via private communication (e-mail, Brightspace/Blackboard) adds a barrier to those simply searching for open meetings. While that password can easily be used by anyone who has access to it – meaning, it is not unique to each user and can be shared freely – it does create a speed bump for bad actors just looking for an open door.
- Control your screen! Do not allow your attendees to share their screen without first asking your permission. By limiting this access, if someone were to join your meeting, they would be unable to share any inappropriate materials to your other attendees.
- How to: https://support.zoom.us/hc/en-us/articles/115005759423-Managing-participants-in-a-meeting (see the section near the bottom: To prevent participants from screen sharing.)
- Limit Chat! After starting your meeting, you can change the chat setting to either disable it completely, or only allow participants to chat with the host. This will prevent a participant from chatting to everyone in the meeting.
The next section is about knowing what to do once the meeting starts and someone tries to interfere with your meeting.
- Kick them out! Make sure that you are familiar with the participant controls. That way, if a user joins unexpectedly, you know how to remove them.
- How to: https://www.pnw.edu/information-services/services/zoom/ (see the question in the FAQ: How do I remove someone from my meeting?)
- Mute all attendees. You can mute all attendees, and not allow them to unmute themselves. This can be helpful in general when trying to prevent unwanted background noise from attendees’ microphones, but is especially helpful when someone is purposely interrupting your session. You can not only mute and un-mute everyone, but you can also prevent attendees from un-muting themselves.
- Lock the door! If everyone you expect in your meeting has arrived, you can lock the meeting to all additional attendees. This will prevent anyone, even if they have the meeting link and password, from joining.
- How to: When you’re in the meeting, click Participants at the bottom of your Zoom window. On the bottom of the Participants window, you will see a button that says “More”. Click on that button, and choose “Lock Meeting.” When you lock the meeting, no new participants can join, even if they have the meeting ID and password.
All Zoom meetings hosted by accounts in the Purdue Zoom environment will only utilize data centers in the United States to handle meeting data.