Editing the Website
When you edit a page in the PNW website system, you’ll use a text editor that works a lot like Microsoft Word or Google Docs. This editor lets you type text, format it, add links and organize content—without needing to know any code.
If you’ve ever bolded text, made a list, or added a link in a document, you already know the basics.

The editor shows your text almost exactly as it will appear on the live website. This makes it easier to understand how your changes will look before they’re published.
If you hover your mouse over any button in the toolbar, a small label appears telling you what that button does. This is a great way to learn as you go!
Tip: If you only see one row of buttons at the top, look for the Toggle Toolbar button (near the end of the row). Clicking it shows additional tools.
Headings
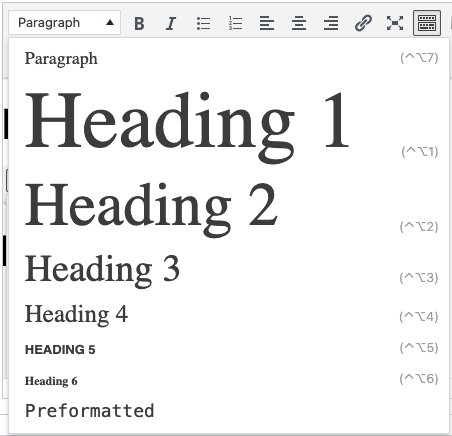
Headings break your page into clear sections, making it easier for readers to scan and understand.
How to add a heading:
- Type your text.
- Highlight the text.
- Choose a heading level (Heading 2, Heading 3, etc.) from the dropdown menu.
- Add a format to the heading level (optional).
Explore formatting options
Reminders About Headings:
- Heading 1 is always reserved for the page title and is already applied automatically.
- Start with Heading 2, then move from Heading 3 to Heading 4 if needed. Don’t skip numbers!
- Using headings correctly helps with accessibility and makes your page easier to read.
Text Styles and Formats
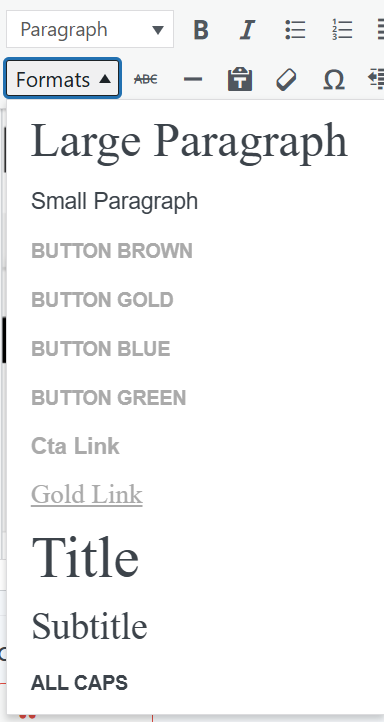
The editor includes built‑in styles created specifically for the PNW website.
How To Apply a Style:
- Highlight the text or link.
- Choose a style from the Formats menu.
To remove a style, highlight the text and select the same option again.
Format Reminders:
- Some styles work only on links.
- Available options may change depending on what you select.
- Less is more: Fancy formatting can make content harder to read. Simple, clear text works best on the web.
Visual Editor Buttons
![]()
- Bold – Bold text style. (Ctrl or Cmd + B)
- Italic – Italic text style. Should be used sparingly on the web. (Ctrl or Cmd + I)
- Bulleted List – Start a new bulleted list, or turn selected text into a bulleted list.
- Numbered List – Start a new numbered list, or turn the selected text into a numbered list.
- Align Left/Center/Right – Used to align text to the left, center, or right of the container. In almost all cases, text should remain aligned to the left.
- Insert/Edit Link – Add or edit a web link. Links can be internal to the Purdue University Northwest website or link to an external web page. The link options dialog window allows you to search for internal pages without knowing the page URL.

- Fullscreen – Expands the Visual Editor to full-screen mode. Click the button again to return to the regular view.
- Toolbar Toggle – Toggles the toolbar between one row and two rows. The second row of buttons appears or hides on toggle.
- Insert Table from TablePress – TablePress is a WordPress extension that allows a table to be managed from one location and then used in multiple locations across the website. Please contact the web team if you need a table added to the TablePress inventory.
![]()
- Strikethrough – Adds strikethrough style to selected text.
- Horizontal Line – Adds a horizontal line to the page.
- Paste as Text – Used to remove formatting when pasting text from an external source. Click this button before pasting text into the Visual Editor.
- Clear Formatting – Removes formatting from the selected text. Works well for formatting that was applied within the Visual Editor, and will remove some formatting copied from an external source.
- Special Character – Opens a modal box with available special characters.
- Decrease Indent – Decreases the indent of the selected text.
- Increase Indent – Increases the indent of the selected text.
- Undo – Undoes the last action in the Visual Editor. Can be used to undo multiple actions.
- Redo – Redoes the last action in the Visual Editor. Can be used to redo multiple actions.
- Keyboard Shortcuts – Opens a modal box with the available keyboard shortcuts.
Frequently Asked Questions
If you run into an issue while making edits, PNW’s web team is happy to help. Your best approach is typically to submit a web-edit request on the Marketing and Communications website—these go directly into our project-management system and are easier to track than email.
To promote a streamlined site map and a focused user experience, creating new pages has been designated a responsibility of PNW’s web team under our revised governance policy. If you’re looking to add pages to your site, please submit a web edit request.
If you only see one row of toolbar buttons, please click the Toggle Toolbar button (second from the end) to expose the second row of buttons. You should only need to do this once.
Anchor links for accordions are a great way to create a URL that can “jump” users to a specific spot on the page. They can be used in emails, social media posts or any external communications where you want users to land somewhere specific.
First, navigate to the ID section of the accordion and enter a unique ID that is reflective of the section content to create your anchor. For example, if you are linking to an accordion about Payment Details, you could enter PaymentDetails in the “ID” field. (It is best to avoid spaces in this field.)
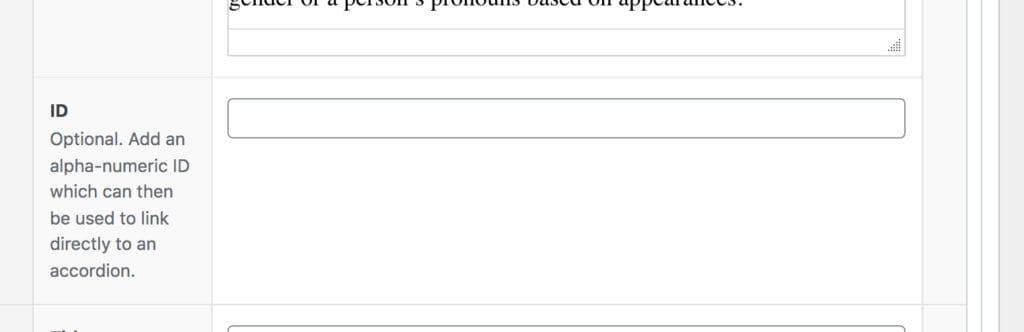
To link to that specific accordion, you will use the page URL followed by # and your ID text. In the example above, it could be www.pnw.edu/test-page#PaymentDetails.
One known bug: if you are linking to an accordion on the same page, you need to omit the final / in your URL before the #.